How to Install a Harley Air Cleaner (Step-by-Step Guide for Beginners in 2026)
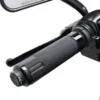
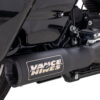
How to Install a Harley Air Cleaner (Step-by-Step Guide for Beginners in 2026) Upgrading your Harley Davidson air cleaner is one of the most effective ways to improve performance, throttle response, and engine efficiency. But many riders hesitate to install one themselves, assuming it requires advanced mechanical skills or special tools. The truth is: installing a Harley air cleaner is one of the most beginner-friendly upgrades you can do at home. In this 2026 guide from HDMotorPartsStore, we’ll walk you through a complete step-by-step installation process, explain what tools you need, highlight common mistakes, and show you how to get the best performance from your upgrade. Whether you ride a Street Glide, Road Glide, Softail, or Touring model, this guide will help you install your air cleaner safely and correctly. Why Upgrade Your Harley Air Cleaner? Before diving into installation, it’s important to understand why riders upgrade their air intake system in the first place. A performance air cleaner improves airflow into the engine, which directly affects: Throttle response Horsepower output Fuel efficiency (when tuned properly) Engine sound Combustion efficiency Stock air cleaners on bikes from are designed for emissions compliance and general riding—not maximum performance. Upgrading gives your engine the air it needs to perform at its best. Tools You’ll Need for Installation One of the best things about this upgrade is that it requires minimal tools. Basic tools required: Socket wrench set Torx screwdriver set Allen key set Clean cloth or rag Thread locker (optional but recommended) Optional tools: Torque wrench (for precision tightening) Contact cleaner (for intake area cleaning) Most riders already have the basic tools at home, making this a very accessible DIY upgrade. Step-by-Step Installation Guide Follow these steps carefully to ensure a smooth installation process. Step 1: Prepare Your Motorcycle Before starting, make sure your bike is: Parked on a flat surface Turned off and cooled down Securely stabilized using a stand This ensures safety and prevents accidental movement during installation. Step 2: Remove the Stock Air Cleaner Cover The first physical step is removing the outer air cleaner cover. Process: Locate the air cleaner assembly on the right side of the engine Remove the visible screws or bolts securing the cover Carefully detach the outer cover Set all removed parts aside in a safe place—you may reuse some components depending on your new kit. Step 3: Remove the Factory Air Filter Assembly Once the cover is removed, you’ll see the stock air filter system. Steps: Unscrew the central mounting bolt Carefully pull out the factory air filter Disconnect any mounting brackets if present Take your time here to avoid damaging surrounding components. Step 4: Clean the Intake Area This step is often skipped—but it’s extremely important. Why it matters: Dust, debris, or oil buildup can reduce performance and damage your new air cleaner. What to do: Use a clean cloth to wipe the intake area Apply contact cleaner if needed Ensure the surface is completely dry before proceeding A clean intake ensures maximum efficiency for your new system. Step 5: Install the New Backing Plate The backing plate is the foundation of your new air cleaner. Installation steps: Align the new backing plate with factory mounting points Insert bolts loosely at first Ensure proper alignment with throttle body Tighten bolts evenly in a crisscross pattern Do not overtighten at this stage—you’ll finalize torque later. Step 6: Attach the High-Flow Air Filter Now install the performance filter element. Steps: Place the filter onto the backing plate Secure it using the provided hardware Ensure a tight but even seal This component is what allows improved airflow into your engine. Step 7: Install the Outer Cover The outer cover completes the look and protects the filter. Process: Align the cover with mounting points Secure using bolts or clamps provided in the kit Ensure no gaps or misalignment Some designs may vary depending on style (open-element, billet, or touring-specific kits). Step 8: Tighten All Fasteners Properly Now go back and tighten everything securely. Tips: Use a torque wrench if available Do not overtighten bolts (can damage threads) Double-check all mounting points Proper tightening ensures vibration resistance during riding. Step 9: Inspect Installation Before starting your bike, perform a full inspection. Check for: Loose bolts Air leaks Misalignment Secure filter placement A quick inspection prevents performance issues later. Step 10: Start the Engine and Test Now it’s time to start your bike. What to look for: Smooth idle No unusual engine noise Proper throttle response No air leaks or whistling sounds Let the engine idle for a few minutes and observe performance. Do You Need a Tune After Installation? This is one of the most important questions riders ask. Short answer: Often yes. A performance air cleaner increases airflow, which changes your engine’s air-fuel ratio. Benefits of tuning: Improved horsepower gains Smoother throttle response Better fuel efficiency Reduced engine strain If your upgrade is part of a larger performance setup, tuning becomes even more important. Common Installation Mistakes to Avoid Even though installation is simple, riders sometimes make avoidable errors. 1. Over-tightening bolts This can strip threads or damage components. 2. Skipping cleaning steps Dirty intake surfaces reduce performance. 3. Misaligned filter assembly This can cause air leaks and performance loss. 4. Ignoring torque specifications Always follow manufacturer guidelines when available. 5. Not checking compatibility Make sure your air cleaner matches your Harley model. Benefits After Installation Once installed correctly, you’ll notice immediate improvements. 1. Better Throttle Response Your bike reacts faster when accelerating. 2. Stronger Engine Performance Improved airflow supports better combustion. 3. Enhanced Riding Experience Smooth and responsive riding feel. 4. Improved Engine Sound Many riders notice a deeper intake tone. 5. Potential Fuel Efficiency Gains Especially during steady highway cruising. 2026 Trends in Air Cleaner Installation Kits Modern air cleaner kits are evolving to make installation even easier. New trends include: Tool-less installation systems Pre-aligned mounting brackets Integrated tuning support designs Lightweight billet aluminum construction High-efficiency washable filters Manufacturers are focusing on plug-and-play performance
Best Harley Air Cleaners for Performance and Fuel Efficiency in 2026
Best Harley Air Cleaners for Performance and Fuel Efficiency in 2026 Upgrading your Harley Davidson air cleaner is one of the most effective yet underrated performance modifications you can make. While riders often focus on exhaust systems or cosmetic upgrades, the air intake system plays a critical role in how your engine breathes, performs, and responds on the road. In this 2026 guide, we break down the best Harley air cleaners for performance and fuel efficiency, how they work, and how to choose the right one for your riding style and bike model. Whether you ride a Street Glide, Road Glide, Softail, or Touring model, the right air cleaner can noticeably improve throttle response, horsepower, and overall engine efficiency. Why Air Cleaners Matter on Harley Davidson Motorcycles Every internal combustion engine relies on a precise balance of air and fuel. Your air cleaner is responsible for controlling how clean and how much air enters the engine. On stock setups, manufacturers prioritize: Emissions compliance Quiet operation General reliability But not maximum performance. A performance air cleaner improves: Airflow volume into the engine Combustion efficiency Throttle response Fuel-air mixture balance Overall horsepower potential In simple terms: more clean air = better engine performance. For riders who enjoy long highway cruising or aggressive acceleration, upgrading this component is one of the highest-impact modifications available. How Harley Air Cleaners Improve Performance A performance air cleaner works by reducing airflow restriction. Stock air intake systems are often limited by narrow passages and restrictive filter materials. Aftermarket air cleaners improve this by: 1. Increasing Airflow Efficiency High-performance filters allow more air into the combustion chamber without sacrificing filtration quality. 2. Improving Throttle Response With better airflow, the engine responds faster when you twist the throttle. 3. Supporting Engine Tuning Air cleaners work best when paired with proper fuel mapping or ECU tuning, allowing the engine to optimize performance gains. 4. Enhancing Combustion Stability Better air circulation improves fuel burn efficiency, reducing hesitation or lag. Types of Harley Air Cleaners in 2026 Understanding the different types of air cleaners helps you choose the right upgrade for your riding style. 1. High-Flow Performance Air Cleaners These are the most popular upgrade option for Harley riders. Features: Oversized air intake design Washable high-flow filter Increased airflow capacity Durable aluminum or billet construction Best for: Highway riders Performance enthusiasts Touring motorcycle owners Benefits: Noticeable horsepower increase Stronger mid-range torque Improved engine sound and responsiveness 2. OEM Replacement High-Performance Filters These are upgraded versions of factory air filters. Features: Drop-in replacement design Improved filtration material Maintains stock appearance Best for: Riders who want subtle upgrades Daily riders Warranty-conscious owners Benefits: Slight performance improvement Better filtration than stock No major installation changes 3. Open-Element Air Cleaners Open-element designs are focused on maximum airflow. Features: Exposed filter element Minimal restriction housing Aggressive styling Best for: Performance-focused riders Custom Harley builds Riders paired with exhaust upgrades Benefits: Maximum airflow potential Strong throttle response gains Aggressive engine sound improvement 4. Touring Performance Air Cleaners Designed specifically for long-distance riding. Features: Balanced airflow and filtration Weather-resistant design Engine heat management support Best for: Touring riders Street Glide and Road Glide owners Long-distance highway riders Benefits: Consistent performance on long rides Reduced engine strain Improved fuel efficiency on highways Best Harley Air Cleaner Benefits (Real-World Impact) Upgrading your air cleaner provides more than just technical improvements—it changes how your bike feels on the road. 1. Better Acceleration You’ll notice faster throttle response when overtaking or merging onto highways. 2. Smoother Engine Operation Improved airflow reduces engine hesitation and improves combustion stability. 3. Increased Fuel Efficiency (in some conditions) When paired with proper tuning, improved airflow can lead to better fuel economy during steady cruising. 4. Improved Engine Sound Many riders enjoy a deeper, more aggressive intake sound after upgrading. OEM vs Aftermarket Air Cleaners One of the most common questions riders ask is whether to stick with OEM parts or upgrade to aftermarket systems. OEM Air Cleaners Designed for factory specifications Prioritize emissions and reliability Limited performance improvements Aftermarket Air Cleaners Designed for performance enhancement Higher airflow capacity Custom styling options Better compatibility with tuning upgrades Verdict: If your goal is performance, aftermarket air cleaners are the clear winner. Best Air Cleaner Upgrades by Riding Style Different riders need different setups. Here’s how to choose the right one. Touring Riders (Street Glide, Road Glide, Electra Glide) Best choice: Touring performance air cleaner Why: Balanced airflow Heat resistance Long-distance reliability Performance Riders Best choice: Open-element high-flow air cleaner Why: Maximum airflow Strong horsepower gains Best throttle response Daily Riders Best choice: OEM replacement high-performance filter Why: Subtle upgrade Low maintenance Reliable filtration Custom Builders Best choice: Open-element or billet air cleaner Why: Visual customization Performance enhancement Flexible tuning options Installation Overview (What to Expect) Installing a Harley air cleaner is one of the more straightforward upgrades, often requiring basic tools. General steps: Remove stock air cleaner cover Unbolt factory air filter assembly Clean intake area Install new backing plate Mount high-flow filter Attach cover or housing Check all seals and fittings Installation time: Typically 30–60 minutes depending on experience. Do You Need a Tune After Upgrading? In many cases, yes. Why tuning matters: A performance air cleaner increases airflow, which changes the air-fuel ratio. Without tuning, the engine may not fully optimize gains. Benefits of tuning: Improved horsepower Smoother throttle response Better fuel efficiency Reduced engine strain For best results, pairing your air cleaner with ECU tuning or fuel management systems is recommended. Common Mistakes Riders Make 1. Choosing Style Over Performance Some riders pick air cleaners based only on looks rather than airflow efficiency. 2. Skipping Engine Tuning This limits performance gains significantly. 3. Ignoring Riding Style Not all air cleaners suit every type of riding. 4. Buying Low-Quality Filters Poor filtration can reduce engine lifespan over time. 2026 Trends in Harley Air Cleaners In 2026, air cleaner design is evolving rapidly with new technology and materials. Key trends include: Lightweight billet aluminum construction Heat-dissipation airflow